Linux Photography IV: RAW Development
Note: Riley Brandt has released some video lessons on using Darktable and other open source software for photo development. I highly recommend checking them out.
Here we are getting into the good part. I've become quite fond of Darktable's RAW developer. The tools are solid and in some areas it even outstrips Lightroom's develop module.
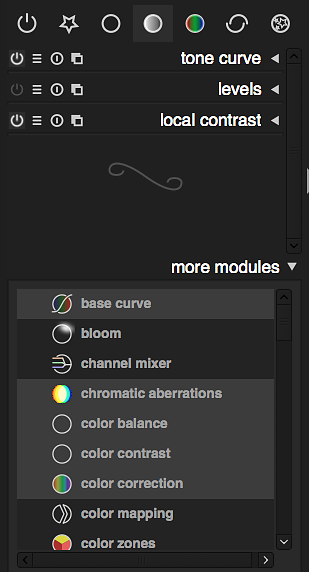
The first thing I noticed is that Darktable doesn't come with a whole lot of modules enabled out of the box. That's easy enough to remedy though, simply expand the area labeled "more modules" and enable the modules you'd like to use. If you click through a few times it will add the module to your favorites list. I recommend enabling color correction, profiled denoise and monochrome as those have been some of my favorites thus far.

Darktable groups modules together in a few logical bins. These groups are called Active, Favorites, Basic, Tone, Color, Correction and Effects in order from left to right just below the histogram. Active is handy for disabling adjustments without digging through the other groups. The Favorites grouping contains all of the modules you've stuck in there. This is analogous to web browser bookmarks. The rest are sort of self explanatory. Things like contrast and exposure are found in the Basic group, tone curve and levels in the Tone group, color correction and input color profile in the Color group, lens corrections in the corrections group, etc. It's pretty logical once you learn your way around the interface but it does take some getting used if you're coming from Lightroom.

I'm not a huge special effects/post processing type photographer so I usually hit a few select modules and export my finished edit. Darktable does store edits in XMP files but not every other software package supports the same adjustments in the same way so it's nice to have a 16-bit TIFF of your final. My first stops are usually input color profile and base curve. Darktable supports camera ICC profiles but not DCP profiles. This posed an issue for me early on as I had been using a ColorChecker Passport and the X-rite software which only generates DCP profiles. This is fine if you're using Lightroom or Camera RAW but not much else. Apparently Argyll CMS supports the ColorChecker Passport with the correct template (which I downloaded). However I could never get it to recognize the test pattern. Not all is lost, I managed to get a working ICC profile from dcp2icc after using X-rite's software on my Mac to create the DCP profile.
Base curve is my next stop, I usually choose the preset that goes along with my camera model. Base curves take the RAW data and essentially tunes it to look good for your monitor. This is similar to the image treatments your camera does to JPEGS when you set it to Camera Standard or Camera Landscape. Darktable has a few built in base curves for each manufacturer and you can create you own as well based on JPEGs from your camera.
If the image needs some exposure tweaks I'll hit up the exposure module. This module works about the same way way as every other exposure adjustment I've ever seen in a RAW developer. Darktable's masking capability is quite good, so it's easy to just paint in adjustments over parts of the image. If no adjustments are needed I'll move on to levels, tone curve, contrast, saturation and local contrast. It's nice to have levels and curves in a RAW developer and when I do end up back in Lightroom for whatever reason I find myself missing it. Local contrast is the closest thing I've found to the clarity adjustment in Lightroom and it works OK, although it seems to highlight noise more than accentuate details. I've been primarily using the tone curve tool to adjust highlights/shadows instead of the highlights and shadows module as it seems to give better results. That's just my findings, you may like the other module better.
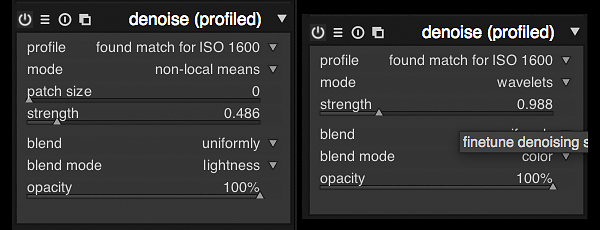
Speaking of noise, be sure to take a look at the profiled denoise plugin. It's a bit complicated looking at first but after some trail and error I've found some settings that seem to work fairly well. The wavelets mode seems to work better with color nosie and the non-local means seems to work better for chroma noise. Thankfully in Darktable can apply the same filter multiple times in multiple modes. Generally I'll duplicate the profiled denoise plugin and set one to wavelets, strength of 1 and blend it uniformly in color mode. For the other I'll set it up as non-local means, strength of 0.5 and blend it uniformly in lightness or HSV lightness mode. Those settings have worked well for me, but you may want to tweak things.

On a side note I'd also recommend looking at the color correction module. It's more of what I'd call a special effect as it's most similar to to split toning in Lightroom. But it's very useful for color grading your images. Much more customizable too.
That's about it for a quick pass through the RAW developer. This isn't intended to be a full tutorial, just a quick breeze through some of the steps I use to edit my RAWs. Next up I'll look at the GIMP and a few specialty programs out there for photo editing in the Linux world.