House, 30 and Growing Up (sort of)
A little over a month ago I turned 30, earlier this year we bought a house and I've recently started looking at strange things called "retirement" and "life insurance" instead of NewEgg, car parts or camera stuff. I don't get it either. There's something terrifying about realizing I could work in my current job until I'm too old to do anything else. That is the stuff of nightmares.
First off the house. We bought a nice place that's kind of out in the middle of nowhere. I've gone from maybe putting gas in my car once a month to doing about 175 miles a week of commuting. The garage is awesome and the house itself is huge. Our Realtor thought we should look at something smaller as this place is really setup for a 4+ person family. But we were largely tired of being cooped up in our ~700-800 square foot apartment and being right on top of each other all the time. Megan and I didn't even have separate office spaces and for those of you who know how I am about my desk can see how that was less than ideal.

The irony of the whole thing is that we mainly bought the place because of the huge bonus room upstairs and we almost never go up there. Seriously, a hobo could be living in it right now and we'd never know it. The first floor is much bigger than we thought so we generally stay downstairs.
I'm still not entirely sure on this whole provincial living thing. It's quiet but the connectivity is awful and I miss being able to walk to work. However there are no loud parties, drunk kids in the front yard, drive by paintings of the neighborhood, sketchy magazine sales people trying to scam you, other seemingly sketchy folks banging on the door asking for rides (we lived less than 30 feet from a bus stop), etc. All of those things actually happened by the way. At my core I think I'm a town or city dweller. I grew up in the countryside and to be perfectly honest I don't have terribly romantic feelings about it. I do miss curbside trash pickup, cell phone service and actual broadband. This DSL is what I call "for humor purposes only." We had to get an actual land line telephone too. However Megan is exceedingly happy out here so I'm content for now. I love having the space to spread out and work on projects too.
I do rather enjoy the garage as well. So much so I've nearly filled up. I recently picked up a used and abused Forester XT for a nice price that I've been working on. It needed a lot of work. New brakes, timing belt and associated hardware, plugs, and exhaust for starters. Still working on the exhaust as both catalytic converters are shot and expensive to replace if I want to stay with stock parts. I may just end up going the after market route. All this has lead me to become even more familiar with turbocharged horizontally opposed engines. That just makes it easier to work on an old Porsche at some point. I've also discovered I really enjoy heated seats, something I though absurdly frivolous before.

A lot has changed in the last few months and I've taken things with different degrees of grace or insanity. At this point I'd say 2/3rds of my coworkers can't stand to be around me. I don't fit in with adults very well. I've also been working on a few new things on the side that don't seem to be going anywhere fast at the moment, more on that later.
Astrophotography Primer Part 2: Gear
In this installment I'm going to go over some of the gear I use in the field, what it does and how I set it up. Please note: don't feel like you need to run out and buy all of what I have listed in this post! It gets expensive, fast. In reality all you need to get started is some sort of camera with manual controls and a decent tripod. I'm also only going to really go over the basics. Once you get deeper into astro work you'll probably want to add things like an auto-guider and acquisition laptop to the mix.
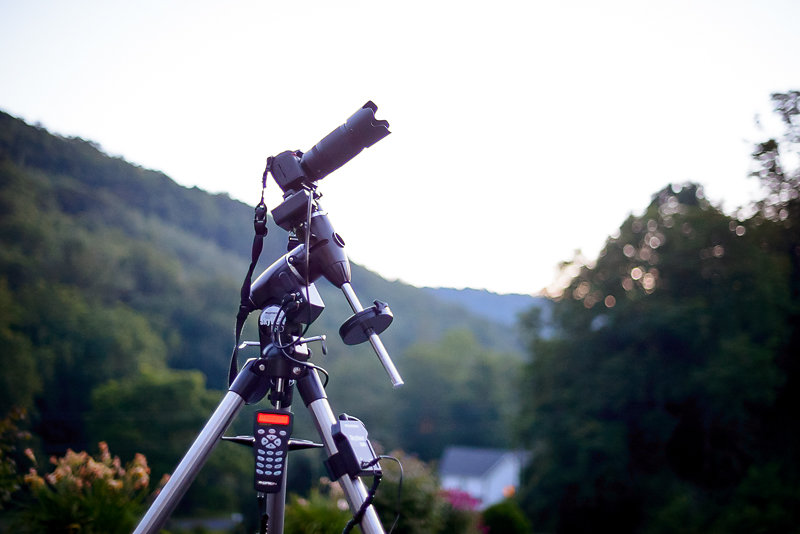
First things first, you do need a camera with manual controls. Shooting at night will severely confuse whatever metering system your camera has. Something with a tripod socket as well. Beyond that anything is fair game. APS-C, full frame, m4/3s, etc are all fine. It just depends on what type of imaging you want to do. Generally full frame is better for wide field while the smaller sensors do better with small telescopic objects. Personally I have both APS-C and full frame, eventually I'd like to add a few smaller sensors to the mix too.
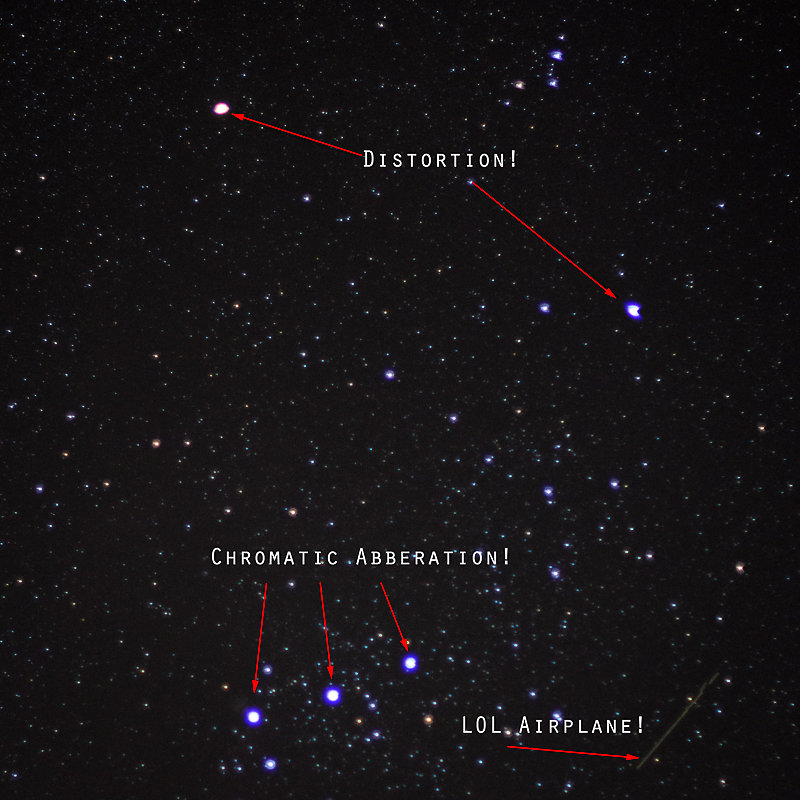
If you're using some sort of camera with interchangeable lenses you'll need some glass to put on that mount. Most people assume that fast lenses are the best for astrophotography and run out, buy ultra-fast primes and shoot them wide open. That's all well and good for terrestrial subjects however stellar objects are a different story. You see, photographing bright points of light on a nearly perfectly black backdrop is a pretty hard task for any lens. Prime lenses are generally especially bad with distortion, chromatic aberration and field curvature when used at their widest aperture. There are a few exceptions, but by and large you're better off closing down a stop or two. This will help alleviate some of the nasty distortions and color fringing. I'm not saying prime lenses are no good for astro work, I use them all the time, just be aware that shooting your 50mm at f/1.4 won't give you good results. Below is an example of what kind of distortion you'll get out of a wide open fast prime. More than likely you'll need to manually focus your lens as well. Most modern lenses do not have a hard focus stop at infinity and the ones that do are sometimes a little off. I usually use Live View on my camera zoomed in on a star and focus the camera that way. You'll want to make the stars as pinpoint as possible and sometimes that'll be harder than others.
If you're using a longer lens (I usually notice it at 300mm at up) you'll probably see the stars sort of shaking on the screen as currents in the atmosphere move around. This is called seeing by astronomers. During a night with good seeing the stars will appear as pinpoints. Conversely on a night with bad seeing the stars will appear as smeared out disks and sometimes the turbulence in the atmosphere will cause them to shake in the view. The longer the focal length of the telescope or lens the more intensified the effects are. Sometimes on nights you can't really use a larger scope you can get away with some imaging at middle to wide focal lengths just fine.
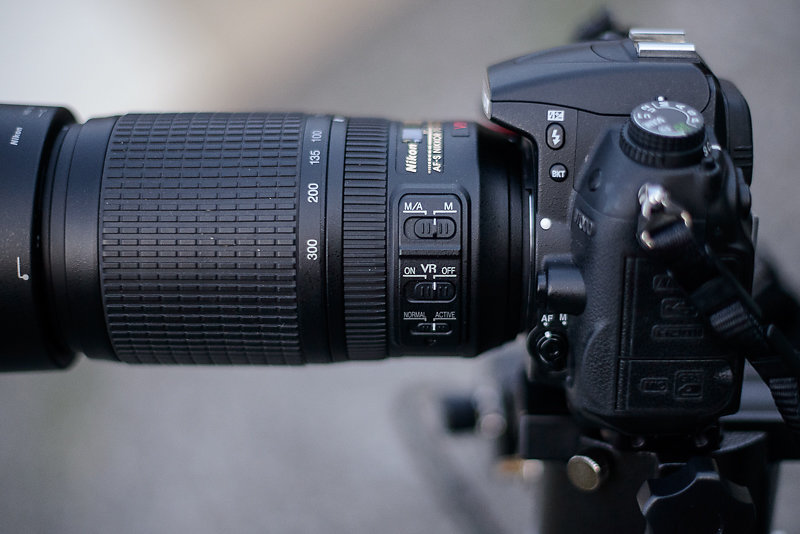
Just doing star trails? Go pick up a solid tripod and ballhead. I like Induro as they seem to have the bang for buck ratio down. A wobbly $20 Wal-Mart wonder isn't going to work.
This brings us to tracking the night sky. Well, rather you'll be counteracting the motion of the Earth. There are a few options here. For the casual astrophotographer or someone looking for a lightweight solution for travel I like the iOptron SkyTracker. It's fairly inexpensive, small and comes with a polar alignment scope. The one limitation is its weight capacity. You're not going to be loading it down with a large lens or telescope. I've heard of folks using a DSLR and 70-200mm zoom with it before but I'd wager that's pushing it. Vixen makes a similar mount called the Polarie and I have a passing familiarity with it as well. As with most things the time spent in preparing is way more important than anything else, this includes aligning the mount. Most polar alignment scopes come with markings for aligning with different constellations in different times of the year. If your alignment isn't spot on you'll get some drift during exposures. It takes practice and some time so plan about 30 extra minutes or more for your first few outings.
For more serious astrophotographers, mainly those who want to use a big lens or a telescope, I recommend picking up some sort of equatorial mount. I own an Orion SkyView Pro GoTo and it will hold up to about an 8" Schmidt-Cassegrain, camera and supporting equipment. I generally like Orion's stuff, but Celestron makes decent mounts too. You can buy a equatorially mounted telescope and use the mount for general wide field work as most equatorial mounts use a dovetail mount that is fairly universal. I'd stay away from driven fork mounts or alt-az mounts as those suffer from field rotation during longer exposures. They're fine for visual use though. As with most things it seems most manufacturers overstate the load capacity of their equatorial platforms. As a safety measure I wouldn't try to load a mount with more than about 75% of it's rated capacity and that I feel is generous, 50% is probably a better number to work with. Loading it to 100% more than likely won't send it crashing to the ground but a strained mount isn't a very sturdy mounting. You'll end up with a lot of bad shots and trailing due to slipping and the motors struggling to keep up. Keep in mind these things are big, heavy and take a long time to setup or take down. You aren't going to be backpacking with most of these mounts. Get a smaller iOptron or Vixen for that.
Next up we'll talk about post processing.
Apollo 11 at 45
Today marks the 45th anniversary of the Apollo 11 moon landing. In a time when our entire civilization was held hostage by two superpowers and our own nation was struggling with massive internal strife we did the impossible. Even in our most tumultuous times humans are capable of greatness. The irony in the whole thing is we used much of the very same technology that threatened our extinction in accomplishing the Apollo program. Proof that our ingenuity is often a double edged sword. Today we face other challenges created by our own cleverness. Hopefully we will use our time and energy wisely to overcome those problems.
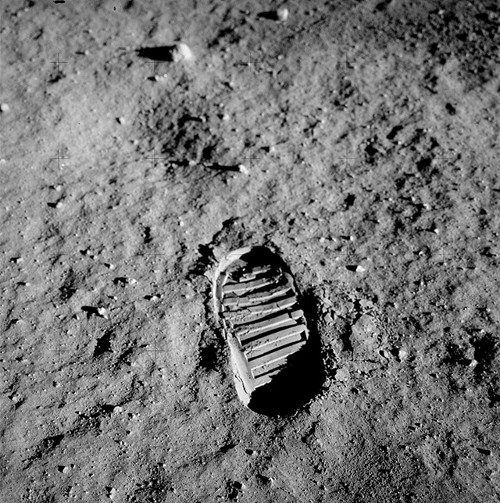
Buzz Aldrin's boot print on the moon
In a few thousand years, long after the people talk about the Americans as we talk about the Romans, ancient Chinese dynasties or the Aztecs today, history books will talk about our civilization's legacy and those who did great things. The great men and women of our time will largely be a footnote. I'd wager that few would remember the Clintons, Bushs, Roosevelts, Kennedys, Lincolns or Obamas. Just as most people today can't name probably more than a few Roman emperors, senators or Chinese dynasties. However three names will be probably come to mind when their history books talk of the Americans: Armstrong, Aldrin and Collins. The photo of a single boot print on another world presented in the same chapter. A reminder of a time when we first escaped the bounds of our planetary cradle and started to take our place as explorers of the cosmos. Perhaps their history books will have other tales of similar experiences on other worlds by other humans. One can imagine.
I'll leave you with a video by Mr Reid Gower who has rehashed some of the words of Carl Sagan. I wasn't alive during the Apollo program so the video and descriptions of those who were is all I have to go on. However I think this video describes the experience well.
Astrophotography Primer Part 1: Fundamentals
Astrophotography has become ever popular in the last decade or so as the equipment to do it well as plummeted in price. Now your average back yard astronomer with less than $3,500 or so in gear can take images that rival large imaging instruments from just a decade ago. You can even get some decent results with less expensive equipment and regular old camera lenses. Over the next few posts I'm going to go throw out there what I do to prepare, shoot, edit and finish my work. This is not the end-all-be-all guide to astrophotography, just a workflow that works for me.
Astrophotography seems easy on the outside but it is easily one of the most complicated, math intensive and taxing types of photography out there. It's not for the impatient. You can spend several hours over the course of one night shooting images and end up with squat on the other side due to poor planning or not understanding the subject. I'll go over some of the common pitfalls here too as I've made the same mistakes myself.
First off you'll need to know the basics of photography. Aperture, shutter speed, ISO, etc. If you don't know that like the back of your hand go figure it out and come back. I'm not trying to be rude, this blog post isn't going anywhere and you need to have a firm grounding. I also come from a math heavy background and will get into some numbers. Nothing most people can't handle but you should be warned.
Cue Jeopardy music ...
Back? Great! Now let's move on. The most basic type of astrophotography involves plunking your camera down on a tripod, grabbing a cable release and shooting some star trails. This is a great, simple way to get started.
All you really need to do star trails is a sturdy tripod, a camera with a cable release, some kind of lens and a few hours of time. That's another thing. A short exposure for most deep sky objects is around 30 seconds. Most of my images have a few exposures ranging up to 10-15 minutes. Dress warmly and bring something with you to occupy the time. A red headlight or flashlight helps too. The longer you leave the shutter open the longer the trails. You'll need an area with fairly dark skies and no light domes on the horizon otherwise you'll over expose and the sky will be a putrid yellow color. A slow ISO (100-400) and small aperture will help too. You'll probably need to do a couple of test shots when you first get going to figure out what you can do at your location.
Another way to dodge the over exposure is to do what's called image stacking. This is where you take a bunch of shorter exposures, say 30 seconds to a minute, in the field and stack them in post to create the star trail effect. For this you'll want to cut off your camera's long exposure noise reduction feature and take dark frames manually.
Say what now? A dark frame? What are you talking about? Glad you asked. If you've ever dug around in your camera's menus you've probably seen a feature called something like "Long Exposure NR," at least that's what NIkon calls it. It should be on by default. What this does is called dark subtraction. If you take a photo with a shutter speed longer than a few seconds the camera will take a dark frame of the same length of time and subtract that from the light frame. Why is this needed? CMOS and CCD sensors generate a lot of noise during long exposures. Some of the older cameras (I'm looking at you my old D200) had some nasty amp glow around the edges of the sensor as well. "OK," you might say, "but how does subtraction help us here?" Digital images are nothing but numbers. As far as the camera and your computer is concerned a RAW file is an array of RGB luminance values or just plain luminance if you have a monochrome sensor Mr/Ms Leica user. In a light frame these numbers are the values that the were read out of the photosites when the shutter closed plus whatever noise was present in the sensor at that time. For shorter exposures in good light this noise is safely ignored. You've got some much signal in the light frame that it's inconsequential. For longer exposures of fainter things this noise becomes a problem and can at times be brighter than the image (light striking the sensor) itself. Temperature can affect this noise as well, generally colder sensors are less noisy.
Thus enters our hero, the dark frame. A dark frame is 100% pure noise. Kind of like your Facebook feed. I'm just kidding Facebook friends, really, or am I? You can take one manually by setting your shutter speed and ISO then leaving the lens cap on so no light strikes the sensor. Aperture doesn't matter. Then you're just left the noise that was present in your sensor at the time of capture. Generally if you're taking many multiple exposures you'll want to manually do your dark frames and subtract them later in post. However, I tend to leave the in camera dark subtract (Long Exposure NR) on for single shots or short series of photos. Depending on your equipment you may need to take bias frames and flat frames. With CMOS based cameras bias frames are not needed as they have a built in circuit that takes care of that for you. It's still needed for CCD based cameras. Bias frames are taken in much the same way dark frames are, that is with no light hitting the sensor. However, bias frames are taken with an exposure time of zero or as close as your camera will get. Again, these are generally not needed for modern cameras as most have CMOS sensors. Flat frames are used to compensate for dust on the lens or sensor. Generally flat frames are taken by aiming the camera at a uniform color frame. Anything uniform in color will work, such as a daylight sky, as long as it's properly exposed and not blown out. For most wide filed astrophotography I don't do flats. Dust doesn't seem to really bother the image much. Plus it's pretty easy to keep lens elements clean. If you're using something like a Catadioptric Telescope (SCT or Mak) they are useful as the imaging surfaces are harder to get to. I consider any lens or telescope under 600mm to be a wide field.
Generally if I'm doing star trails, which I don't do very often, I'll do a bunch of 45-60 second exposures, a few dark frames at the end of the night then do the subtraction and stacking in post. However, there's nothing wrong with just doing a 30 minute exposure to test the waters. You just introduce a higher likely hood that something will go wrong and you'll lose the work.
In the next post I'll detail some of the gear I use in the field and some concepts for shooting.
Quake 3 based games and DDoS amplification attacks
Quake 3 is one of those games that has hung around for a very long time. Not only that but its engine has been used as the basis of a ton games since the early 2000s. Id software later released the engine under the GPL and this has made it an even more popular choice for developers. Long story short, this engine isn't going anywhere anytime soon.
Given its popularity, age, and simplicity it wasn't too surprising that folks are finding was to use it in a amplification attacks. It's happened to a few ioQuake3 servers I manage. At first I thought someone was trying to take my machine offline (I've had that happen too) but after some analysis I figured out what was going on. The attacks seem to come and go almost on a seasonal basis and have started cropping up again lately. In light of that I'd thought I'd share the resources I've been using to combat the problem.
Amplification attacks gained popularity in the DNS world. It's a very simple concept. The attacker spoofs their source IP address, makes a request to an unsuspecting server, and the server responds to the spoofed address. The attacker can quickly roll through a bunch of servers and redirect data to the target machine via the spoofed address. This is why it's called an amplification attack, because the attacker can gain much more throughput by combining traffic from several different sources than they could on their own connection.
Every now and again I see people using Quake 3 servers in these attacks. This includes Quake 3 Arena, ioQuake3, older COD games, etc. Anything based off the Quake 3 really. The attack is easy spot because you'll notice a disproportionate amount of traffic outbound on 27960 (or whatever port you're running the server on) compared to what's coming in. It'll jump out like a sore thumb in tcpdump, Wireshark or any other number of traffic monitoring tools. Attackers like using these games because they usually run on a standard port and are easily listed in game browsers. This allows them to dodge the suspicion that a port scan would bring them from their own ISP. In my experience it seems the attackers like to use the getstatus command as it returns a fairly large chunk of data, including a list of the connected clients. Generally in amplification attacks the attacking party will go with whatever will fire out the most data.
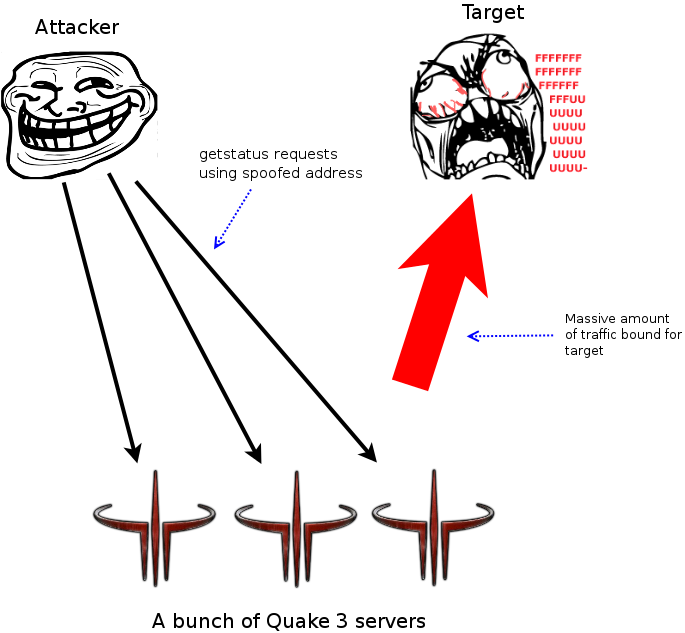
A quick diagram of a amplification attack ...
Right now it seems like the best you can do is mitigate these attacks. The ioQuake3 folks have added some code into their version of the engine that can help. However it doesn't completely prevent your server from being used in an amplification attack. If your server is running on Linux there's a solution over at RawShark's blog via iptables.
# Intial fitlering. Do a little limiting on getstatus requests directly in the input chain.
iptables -A INPUT -p UDP -m length --length 42 -m recent --set --name getstatus_game
iptables -A INPUT -p UDP -m string --algo bm --string "getstatus" -m recent --update --seconds 1 --hitcount 20 --name getstatus_game -j DROP

# Quake 3 DDoS mitigaton table.
iptables -N quake3_ddos

# accept real client/player traffic
iptables -A quake3_ddos -m u32 ! --u32 "0x1c=0xffffffff" -j ACCEPT

# match "getstatus" queries and remember their address
iptables -A quake3_ddos -m u32 --u32 "0x20=0x67657473&&0x24=0x74617475&&0x25&0xff=0x73" -m recent --name getstatus --set

# drop packet if "hits" per "seconds" is reached
# NOTE: if you run multiple servers on a single host, you will need to higher these limits
# as otherwise you will block regular server queries, like Spider or QConnect
# e.g. they will query all of your servers within a second to update the list
iptables -A quake3_ddos -m recent --update --name getstatus --hitcount 5 --seconds 2 -j DROP

# accept otherwise
iptables -A quake3_ddos -j ACCEPT

# finally insert the chain as the top most input filter
iptables -I INPUT 1 -p udp --dport 27960 -j quake3_ddos
If you're running multiple servers on the same host replace the last line with the following:
iptables -I INPUT 1 -p udp --dports 27960,27961,27962 -j quake3_ddos
Again thanks to RawShark for that.
These rules will prevent your server from responding to these spoofed request. They do this by matching the request with the address it claims to be coming from and then dropping the traffic if it gets more than five hitcounts in two seconds. The initial filtering will look for a slightly different behavior directly in your input chain. With this in place your server will still get those bad requests but it won't respond to them. Usually the parties running the attack will give up in a matter of hours or a day if they don't get the desired response from your machine.
It can also be helpful to run your server on a non-standard port. While this often will just provide some security through obscurity it does seem to thwart the laziest folks in this type of scenario, which fortunately seems to be a lot of them. This has the disadvantage of having you server not show up in game browsers and a lot of public directories so it may be a no-go for some folks.
As an administrator of a Quake 3 server these attacks can range from annoying to serious business. If enough people are using your machine as an amplification point it can get you blacklisted by a number of service providers. In my experience the likely hood of it affecting your server directly is relatively low. However this is one of those "good internet citizen" things that is generally nice to keep an eye on so you aren't knocking your neighbor offline. Please be aware this doesn't "harden" your server or make things more s
What Telescope Should I Buy? 2013 Edition.
It's probably the time of the year but I've had an uptick of question regarding telescope and optics purchases lately. This will be a pretty quick read for most you, the answer you seek is here.
"But," you say "I want to do astrophotography" and you continue "or I want a telescope with tracking or go to capbilities."
No, you don't.
At least not right away. Go to and tracking scopes sound good in theory but by and large the are an order of magnitude more expensive than their less intimidating Dobsonian brethren in the same aperture. That usually doesn't include whatever power supply they require which keeps you close to the car or some other in home power source and probably away from dark skies. Sure, you can get a cheaper go to scope but it has a piddly fraction of the aperture of the Dob. When you're talking telescopes aperture is king. The 203mm (8") Dob has around 5x the light gathering capabilities of the 90mm Mak. Fainter nebulae and galaxies will look a lot better in the Dobsonian, although both will probably work well on planets and the moon.
There's also the problem of usability. Telescope companies are terrible at UI design and most go to controllers have the usability of an 80s era VCR that's been crammed full of ham sandwich. Could you figure out how to set the clock on one of those? Yes? No? If you're new to astronomy in general double the difficulty factor. I've seen maybe computerized scopes left to gather dust or end up on Craigslist because the were way more difficult to use than the owner bargained for.
If you're already familiar with the night sky and the fundamentals of observing a go to scope can be a very useful tool. However I'm assuming if you're reading this article then you're a beginner looking to make their first purchase. Learning basic astronomy, observing techniques, and your way around the night sky is a lot to take in without having the somewhat of a kludge go to system getting in the way and demanding attention. Once you've learned the basics it's much easier to move up to the more advanced equipment and use it effectively.
Personally I have both a larger Dob and a computerized mount for my small refractor and SCT. Usually I can have the Dob setup in ten to fifteen minutes, including getting it out the door. The computerized mount takes at least double that to setup if not more and I'm pretty experienced with it. That can really eat into your ambition to go out with the scope when it takes that long to setup, I know it does me.
If you want to do astrophotography I highly recommend starting with a Vixen Polarie or iOptron Skytracker with a sturdy tripod and start out with a plain old DSLR and a few lenses. You'll be surprised what you can get with just a DSLR and a mid-range telephoto lens. Learn some post processing techniques too. I recommend looking into Deep Sky Stacker. Once you start moving into telescope territory you'll want to learn about auto guiding too. You can see how this gets very expensive and complicated very quickly. Not something I'd recommend for the beginner.
If for some reason you are still reading this post and are not a beginner and are looking to move into a more advanced scope I suggest taking look at Orion's or Celestron's line. I prefer equatorial to fork mount scopes, especially for SCTs and Maks. Fork mounted scopes can run into problems near the zenith if you add things like cameras or external Crayford style focuers later on. But that's mostly a preference thing I suppose.
Hopefully someone found something in here helpful.
ISON Update
After a brief resurgence in brightness over the last 24 hours it seems that ISON is fading out again.
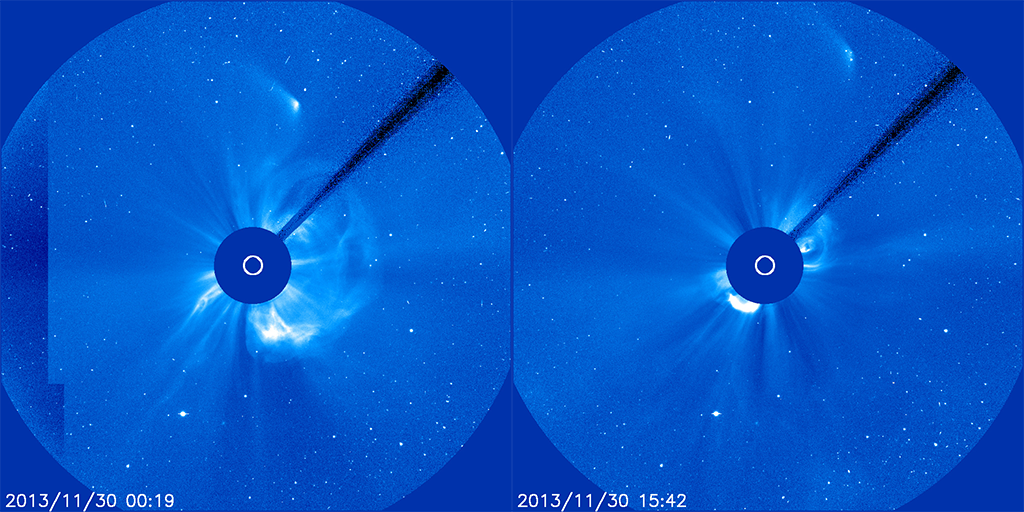
These images are from SOHO's LASCO C3 camera taken almost 16 hours apart. It looks like whatever made it around the sun was probably not very substantial and might be dying down as it moves away from the sun. However ISON has been behaving strangely since perihelion and may yet surprise us again. Definitely something to watch over the next week or so, but I wouldn't bet on it being terribly spectacular at this point.
Comet ISON's perihelion mystery
Apparently it's a tradition for some to watch the Thanksgiving football game. I'm not much for sports so I'll just have to take other people's word on that. I however was watching the ISON's perihelion pass via SOHO, SDO, STEREO, and the NASA Google+ hangout for the event. Mostly from my iPhone as we were at the in-laws with no WiFi for the laptop. First of all I'm still slightly amazed that I managed to watch a comet pass the Sun in nearly real time on a mobile phone. Hooray 2013! Well, more like hooray 2010 given the age of my phone but I digress.
Given what I was seeing from SOHO's LASCO C2 camera I though ISON was a goner, it seemed that most everyone else was in agreement with this too. Below is an animated GIF of SOHO images showing what appears to be the comet's nucleus disintegrating. Notice how it goes form sharp, bright, well defined object to what I called a "smeared out mess" at the time.
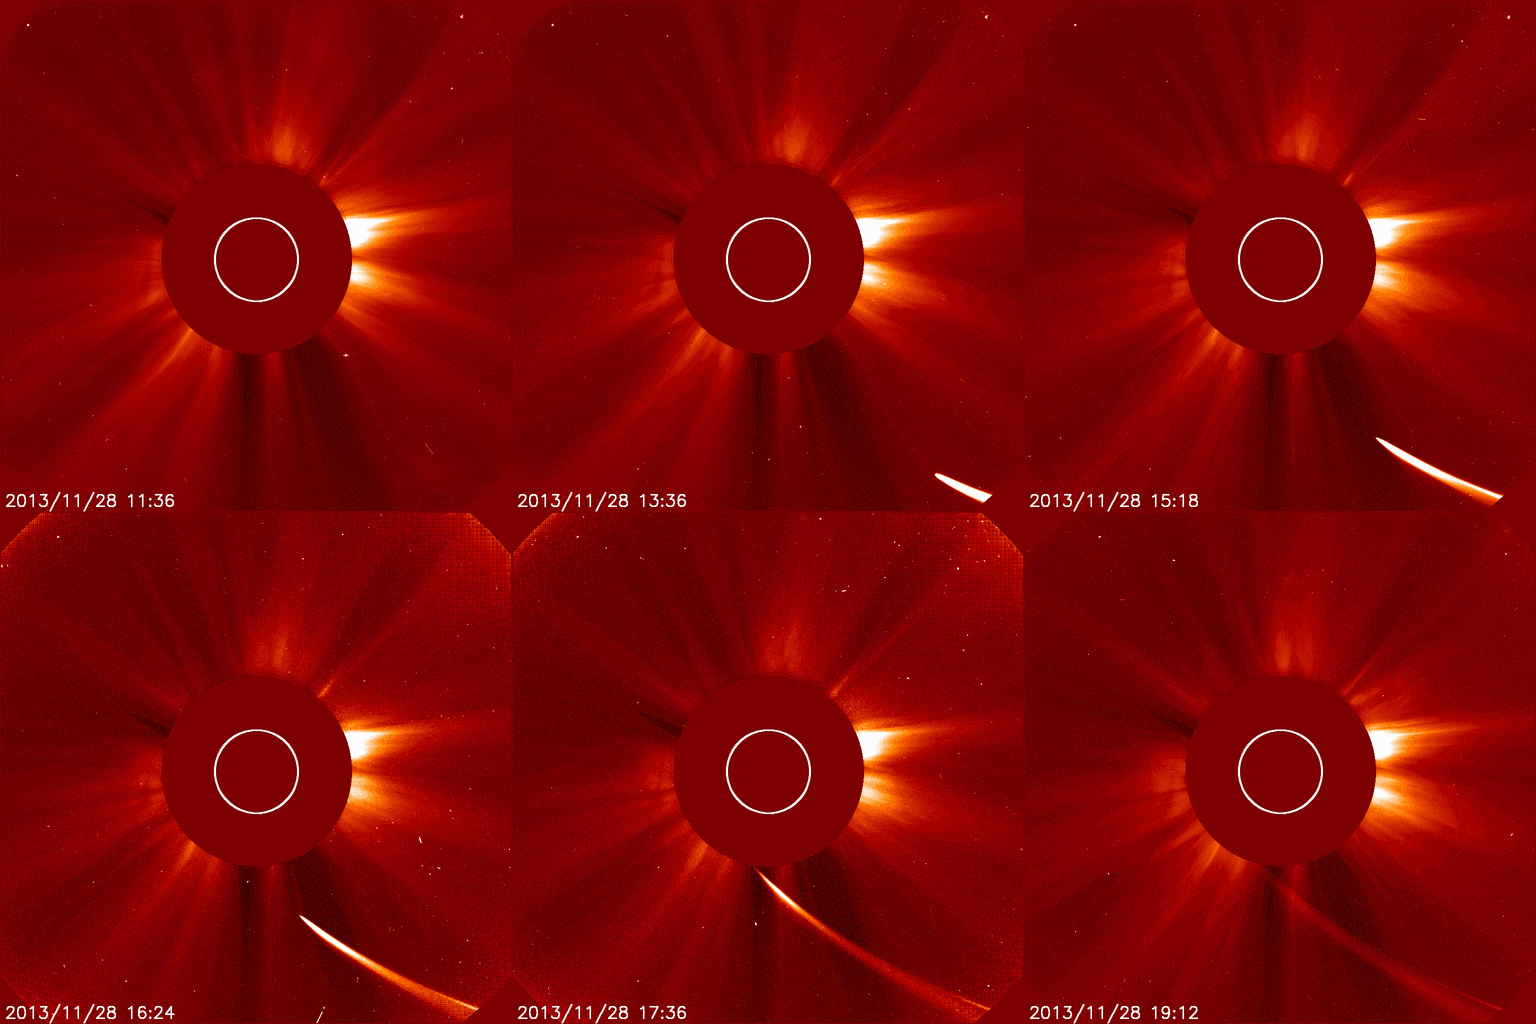
Indeed SDO never caught sight of ISON as predicted and what showed up on LASCO C2 in ISON's predicted path looked to just to be remnants of the nucleus that had been strewn about.
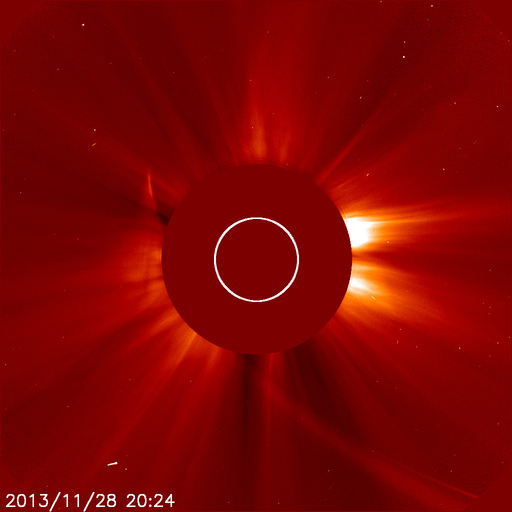
At this time most of the official NASA channels were calling it dead. It certainly looked that was the case to me as well. A bit disappointing but it would still provide a good bit of data to look at. ISON is a bit unique in that it's an Oort Cloud object and a sun grazer, so whatever we could get from its demise could provide some information on the components of the early solar system. It was expected that the debris would float around in the solar atmosphere for a while and give the fleet of spacecraft watching the Sun time to gather some data on the comet's composition, etc.
However a few hours later whatever was left of ISON started getting brighter and showing up nicely on SOHO's LASCO C3 camera. C2 is a tighter view and C3 is its wide field brother.
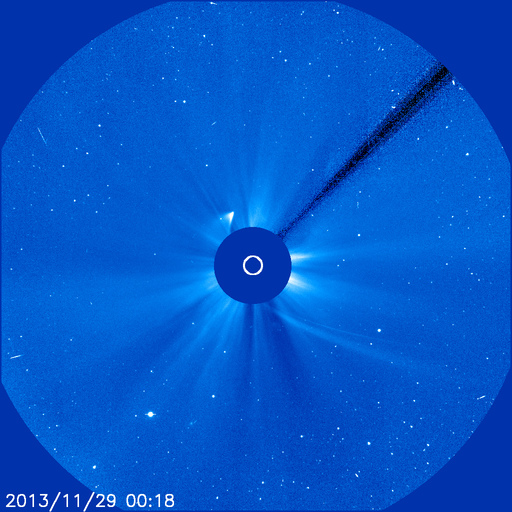
So what's going on here? I honestly don't know. Most of the people I follow and communicate with in the astronomy community are confounded too. It looks like we either have a chunk of nucleus that survived or a perhaps a "headless comet." That is a comet without a defined coma or nucleus, just a jumble of material. The best thing to do at this point is continue monitoring the comet and see what happens. We may yet have it adorn our winter skies here in the northern hemisphere but I wouldn't put much money on it.
The exciting thing here is that we have a wealth of images and data to go over. It seems we might not know as much about these Oort Cloud objects as we thought. Even if ISON has evaporated or disintegrated it will be useful to planetary scientists studying these things.
Ambient Weather WS-2080 temporary fix for WView 5.20.2
I recently picked up an Ambient Weather WS-2080 weather station for the backyard. It's been working great outside of a little quirk with the USB console. Every once in a while the console would drop its USB connection and stop communicating with my Debian Linux machine. The console's display would work fine and still show relevant data. After some log digging I found this nifty little error:
wviewd[6885]: : WH1080: readFixedBlock bad magic number 46 00`
The hex values would change but the error remained the same. I found this was typical behavior for this hardware and the EasyWeather software (Windows only) provided by the manufacturer seems to not check for the correct magic numbers in memory, at least according to some USB sniffing. The console kept working otherwise, it would display the correct data and accept inputs, the drive just refused to connect to it via USB. Clearing the console's memory fixes the issue. Ambient Weather kindly provides memory maps of the console on their wiki for open source developers. As an aside, that's pretty awesome, not many hardware manufacturers do that anymore. However, it seems either the memory maps don't include all of the values indicating a successful initiation or newer consoles have different map than they've posted.
After looking at the WH1080 drivers in the source code for WView I found an if statement in the function in the wh1080Protocol.c file that actually does the checking:
// Check for valid magic numbers:
// This is hardly an exhaustive list and I can find no definitive
// documentation that lists all possible values; further, I suspect it is
// more of a header than a magic number...
if ((block[0] == 0x55) ||
        (block[0] == 0xFF) ||
        (block[0] == 0x01) ||
        ((block[0] == 0x00) && (block[1] == 0x1E)) ||
        ((block[0] == 0x00) && (block[1] == 0x01)))
    {
        return OK;
    }
    else
    {
        radMsgLog (PRI_HIGH, "WH1080: readFixedBlock bad magic number %2.2X %2.2X",
                   (int)block[0], (int)block[1]);
        radMsgLog(PRI_HIGH,
                  "WH1080: You may want to clear the memory on the station "
                  "console to remove any invalid records or data...");
        return ERROR_ABORT;
    }
This bit of code returns an error and causes the driver to fail if the correct magic number isn't detected. From the comments it appears that even the WView developers are unsure as to whether or not these magic numbers are actually what Ambient Weather claims to be and not more of a header. At any rate this behavior is a bit frustrating. You can't really leave the console unattended for a long period of time and from what I can tell the data isn't junk and there doesn't seem to be any major issues with the console's readings. So far the fix seems to work as intended, now it just reports the magic numbers to the log:
wviewd[23990]: : WH1080: readFixedBlock unknown magic number 44 BF
or
wviewd[17036]: : WH1080: readFixedBlock known magic number 55 AA
EDIT:
I forgot to post my modifications to the WView WH1080 driver in the original post, it is as follows:
    // Check for valid magic numbers:
    // This is hardly an exhaustive list and I can find no definitive
    // documentation that lists all possible values; further, I suspect it is
    // more of a header than a magic number...
    if ((block[0] == 0x55) ||
        (block[0] == 0xFF) ||
        (block[0] == 0x01) ||
        ((block[0] == 0x00) && (block[1] == 0x1E)) ||
        ((block[0] == 0x00) && (block[1] == 0x01)))
    {
        radMsgLog (PRI_HIGH, "WH1080: readFixedBlock known magic number %2.2X %2.2X",
                   (int)block[0], (int)block[1]);

        return OK;
    }
    else
    {
        radMsgLog (PRI_HIGH, "WH1080: readFixedBlock unknown magic number %2.2X %2.2X",
                   (int)block[0], (int)block[1]);
        return OK;
    }
The data being reported by the console over USB doesn't look bogus and matches it shows on its LCD display. So far so good.
Addendum: Since I originally wrote this fix I've found another bug. I'm not sure if I've got a bad console or if Ambient Weather changed their memory maps and didn't update their documentation, given the amount of reports on the WView mailing lists of errors like this I'm guessing it's the latter. It seems to be a more recent development going by the posts. Again the console is still displaying and reading data from the sensors fine. It's just the USB communication that is borked. At any rate I've added an adjusted the behavior around line 212 in the wh1080Protocol.c file. Right now I'm just doing this to debug the console output and see if it really is junk or if the memory map is just different. I wouldn't use this is a serious production setup:
        // Read 32-byte chunk and place in buffer:
        // lgh edit: not sure if this is a good idea or not, having it continue on
        // if the retVal isn't as expected, mostly for debugging the console.
        // I want to see what data it's giving back, even if it is junk.

        retVal = (*(work->medium.usbhidRead))(&work->medium, newBuffer, 32, 1000);
        if (retVal != 32)
        {
            radMsgLog (PRI_HIGH, "WH1080: read data block error, continuing ...");
            return OK;
        }
I changed out a return ERROR_ABORT for a return OK so the driver will still download the data from the console even if it returns more than a 32-byte chunk. This seems to be related to the amount of data points stored in the consoles memory. My guess is it's trying to return more than one data point at once to catch up whatever logging software is on the other end of the USB connection. This is just a guess though. Hopefully I'll know more later once the error crops back up.
Unnecessary cloud accounts or why I returned the Eye-Fi SD card ...
A few weeks back on the parkway I lost one of my SD cards. I keep one in the D800 for JPEGs to take a quick look at on my laptop, the RAW files live on my much faster Transcend CF card. It's not a dire emergency as having the JPEGs to peruse while I'm away from my desktop is more of a convenience so I waited a while before replacing it. I'd heard a lot about these WiFi SD cards and the ones from Eye-Fi are pretty much considered the gold standard it seems. They also had the best user reviews on Amazon. That made it seem like an easy enough choice so I picked up one of their 16GB X2 Pro models.
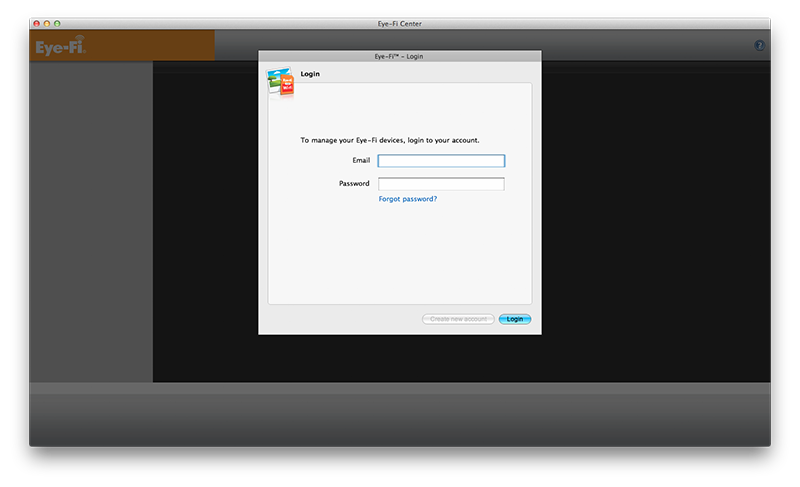 *I need an account with your service to even use my card? You've got to be kidding me ... *
This seemed like a great idea at the time. I'd be able to transfer and view photos on my laptop or mobile phone without having to remove the card from the camera. Besides the obvious convenience factor it would make it a lot less likely to lose the card in the field. Once the card arrived I installed their software, plugged in the card, and expected to be done in a couple of minutes with the configuration.
This is where I started running into problems. Apparently Eye-Fi requires an account (albeit a free one) with their servers to even use their card. Upon firing up their software you are greeted with the above screen, there's no way around it. All I really wanted out of the card was the ability to view and transfer photos to my devices. I wasn't looking to auto-upload everything to Flickr or Facebook and I certainly wasn't looking to upload my photos to their service. Even if you are just planning on using the card on your private network with your own devices or a private SFTP server it still requires an Eye Fi account. That seemed a bit ridiculous to me, they also are bit pushy with their own service and it isn't terribly obvious if the images are being transmitted to their server or not without watching your network traffic. I don't know if there's any encryption done between the client and their side of things as I didn't really get that far with the process.
I began searching and found a few people with the same problem I had with the software. Yes, I probably should have researched the card better before purchase but from the glowing reviews it didn't seem like there were any major issues. Thankfully Amazon has a generous returns policy. I know most people would have just kept using the card but to me it's a matter of principle. I don't like having to "check in" with the cloud before I can use hardware. I gave you money to own your lovely device, end of transaction. I don't want to have to deal with registering or checking in unless I need support or a warranty replacement. Optional accounts for synchronization or storage services are OK in my opinion, but the keyword there is optional. This whole "X as a service" paradigm has me in a major grumpy old man mode. It's worse for software. As far as I'm concerned it just tells me that you assume your customers are criminals and can't be trusted. Yeah, I'm looking at you Adobe and Microsoft.
Thankfully there are alternatives for those of us who prefer to keep things locally for the most part. Transcend makes a WiFi card I plan on trying out. It's a good bit cheaper than the Eye-Fi and apparently has a web based configuration utility running on the card. No desktop software to install or accounts needed. That sounds like a better setup to me. Apparently it lacks the push capability of the Eye-Fi cards but I'm willing to make that trade.
